Basic Odoo System Configuration
1. Company Configuration
Before starting to use Odoo, it's important to configure your company information.
-
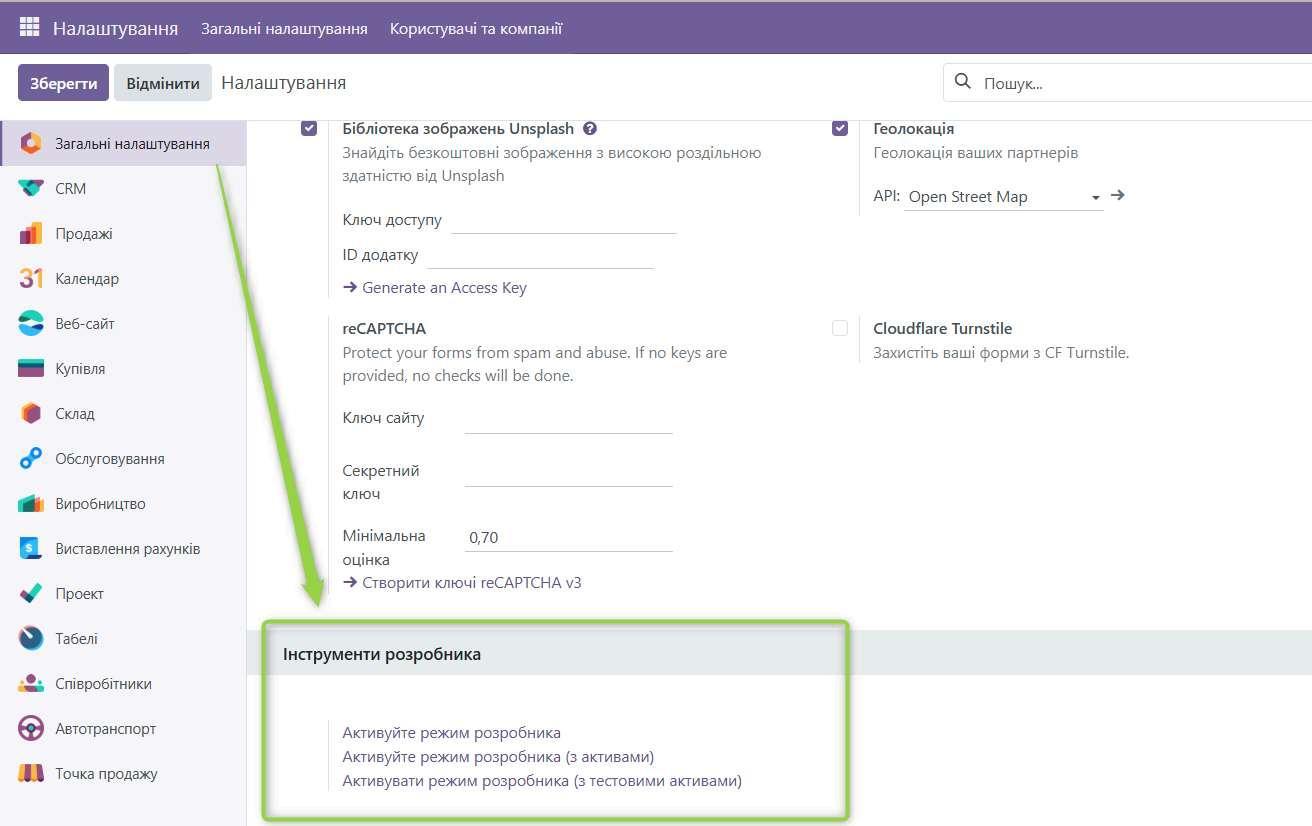
Enable Developer Mode:
- Go to "Settings" > "General Settings".
- Scroll down to the "Developer Tools" section and activate "Activate the developer mode".
-
Go to Settings:
- Click on the "Home menu" icon in the upper left corner of the screen and go to "Settings" menu
- In the "Settings" menu, select "Users & Companies"
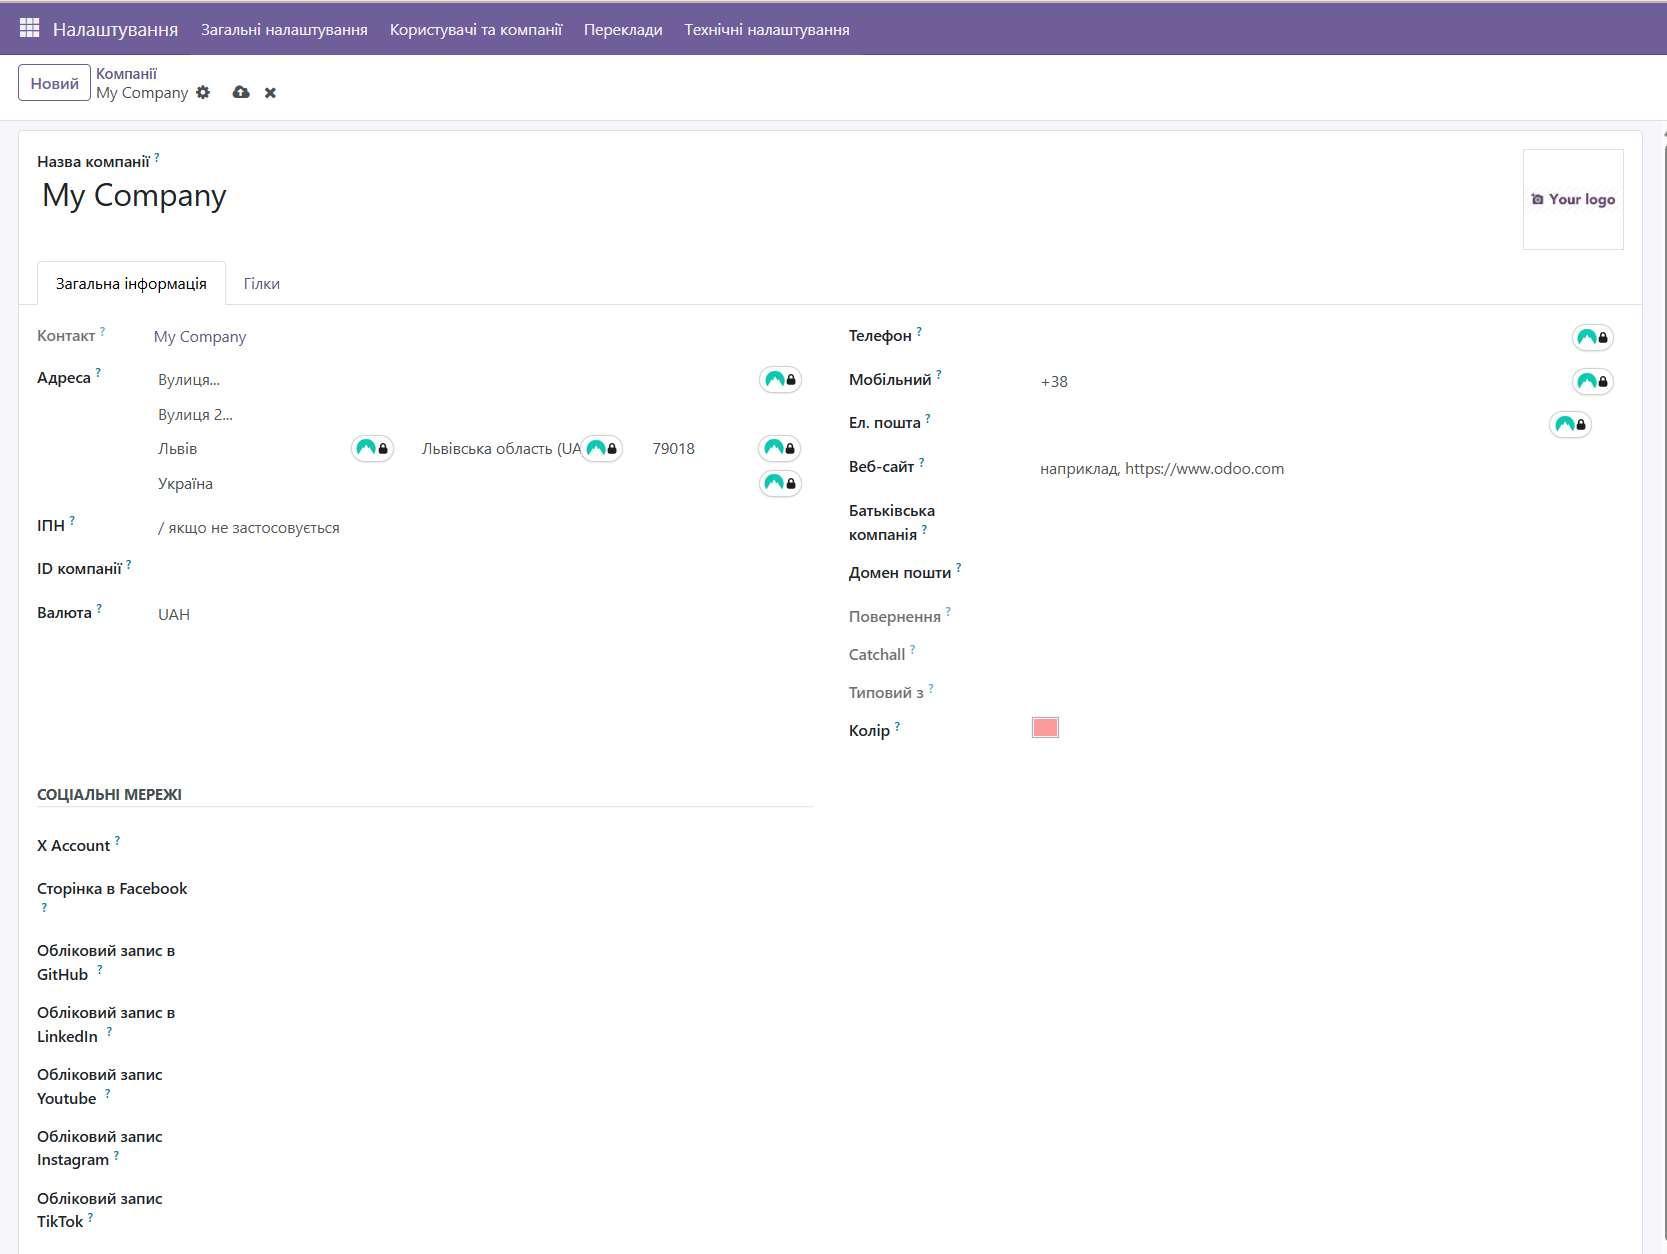
- Go to the "Companies" submenu and select the My Company company.
-
Fill in Your Company Information:
- Company Name: Enter your company's official name.
- Address: Enter your company's complete address.
- Logo: Upload your company's logo.
- Website: Enter your company's website address.
- Phone Number: Enter your company's phone number.
- Email: Enter your company's email address.
-
Currency: Select the main currency your company will use.
-
Other Fields: Fill in other fields as desired
-
Save Changes: Click the "Save manually" button or navigate to another menu for automatic save.
2. What is Multi-Company and Branches in Odoo?
- Multi-Company: The multi-company feature in Odoo allows managing multiple companies in one database. Each company has its own data, such as customers, products, invoices, and reports. This is useful for organizations that have multiple legal entities or business units.
- Branches: Branches (or subsidiaries) are subdivisions of a company. They can be physical locations or organizational units. Branches can share data with the main company or have their own unique data.
Using Multi-Company and Branches
- Switching Between Companies: In the upper right corner of the screen you will see a dropdown list with the current company name. Click on it to switch between companies you have access to. If you don't see the list of companies or branches you need, additionally configure the list of available companies on your user.
- Filtering Data by Company: In many modules you can filter data by company to see only information related to a specific company or branch.
- Multi-Company Reports: Odoo allows creating reports that consolidate data from multiple companies or show data for each company separately.
3. System Users
Creating Users
-
Go to User Management:
- In the "Settings" menu, select "Users & Companies" > "Users".
-
Create New User:
- Click the "Create" button.
- Name: Enter the user's name.
- Email: Enter the user's email address (it will be used to log into the system).
- Access Rights: Select access rights for the user (see next section).
- Company Information: Specify which company the user belongs to (if you have multiple companies configured).
- Save Changes: Click the "Save manually" button or navigate to another menu for automatic save.
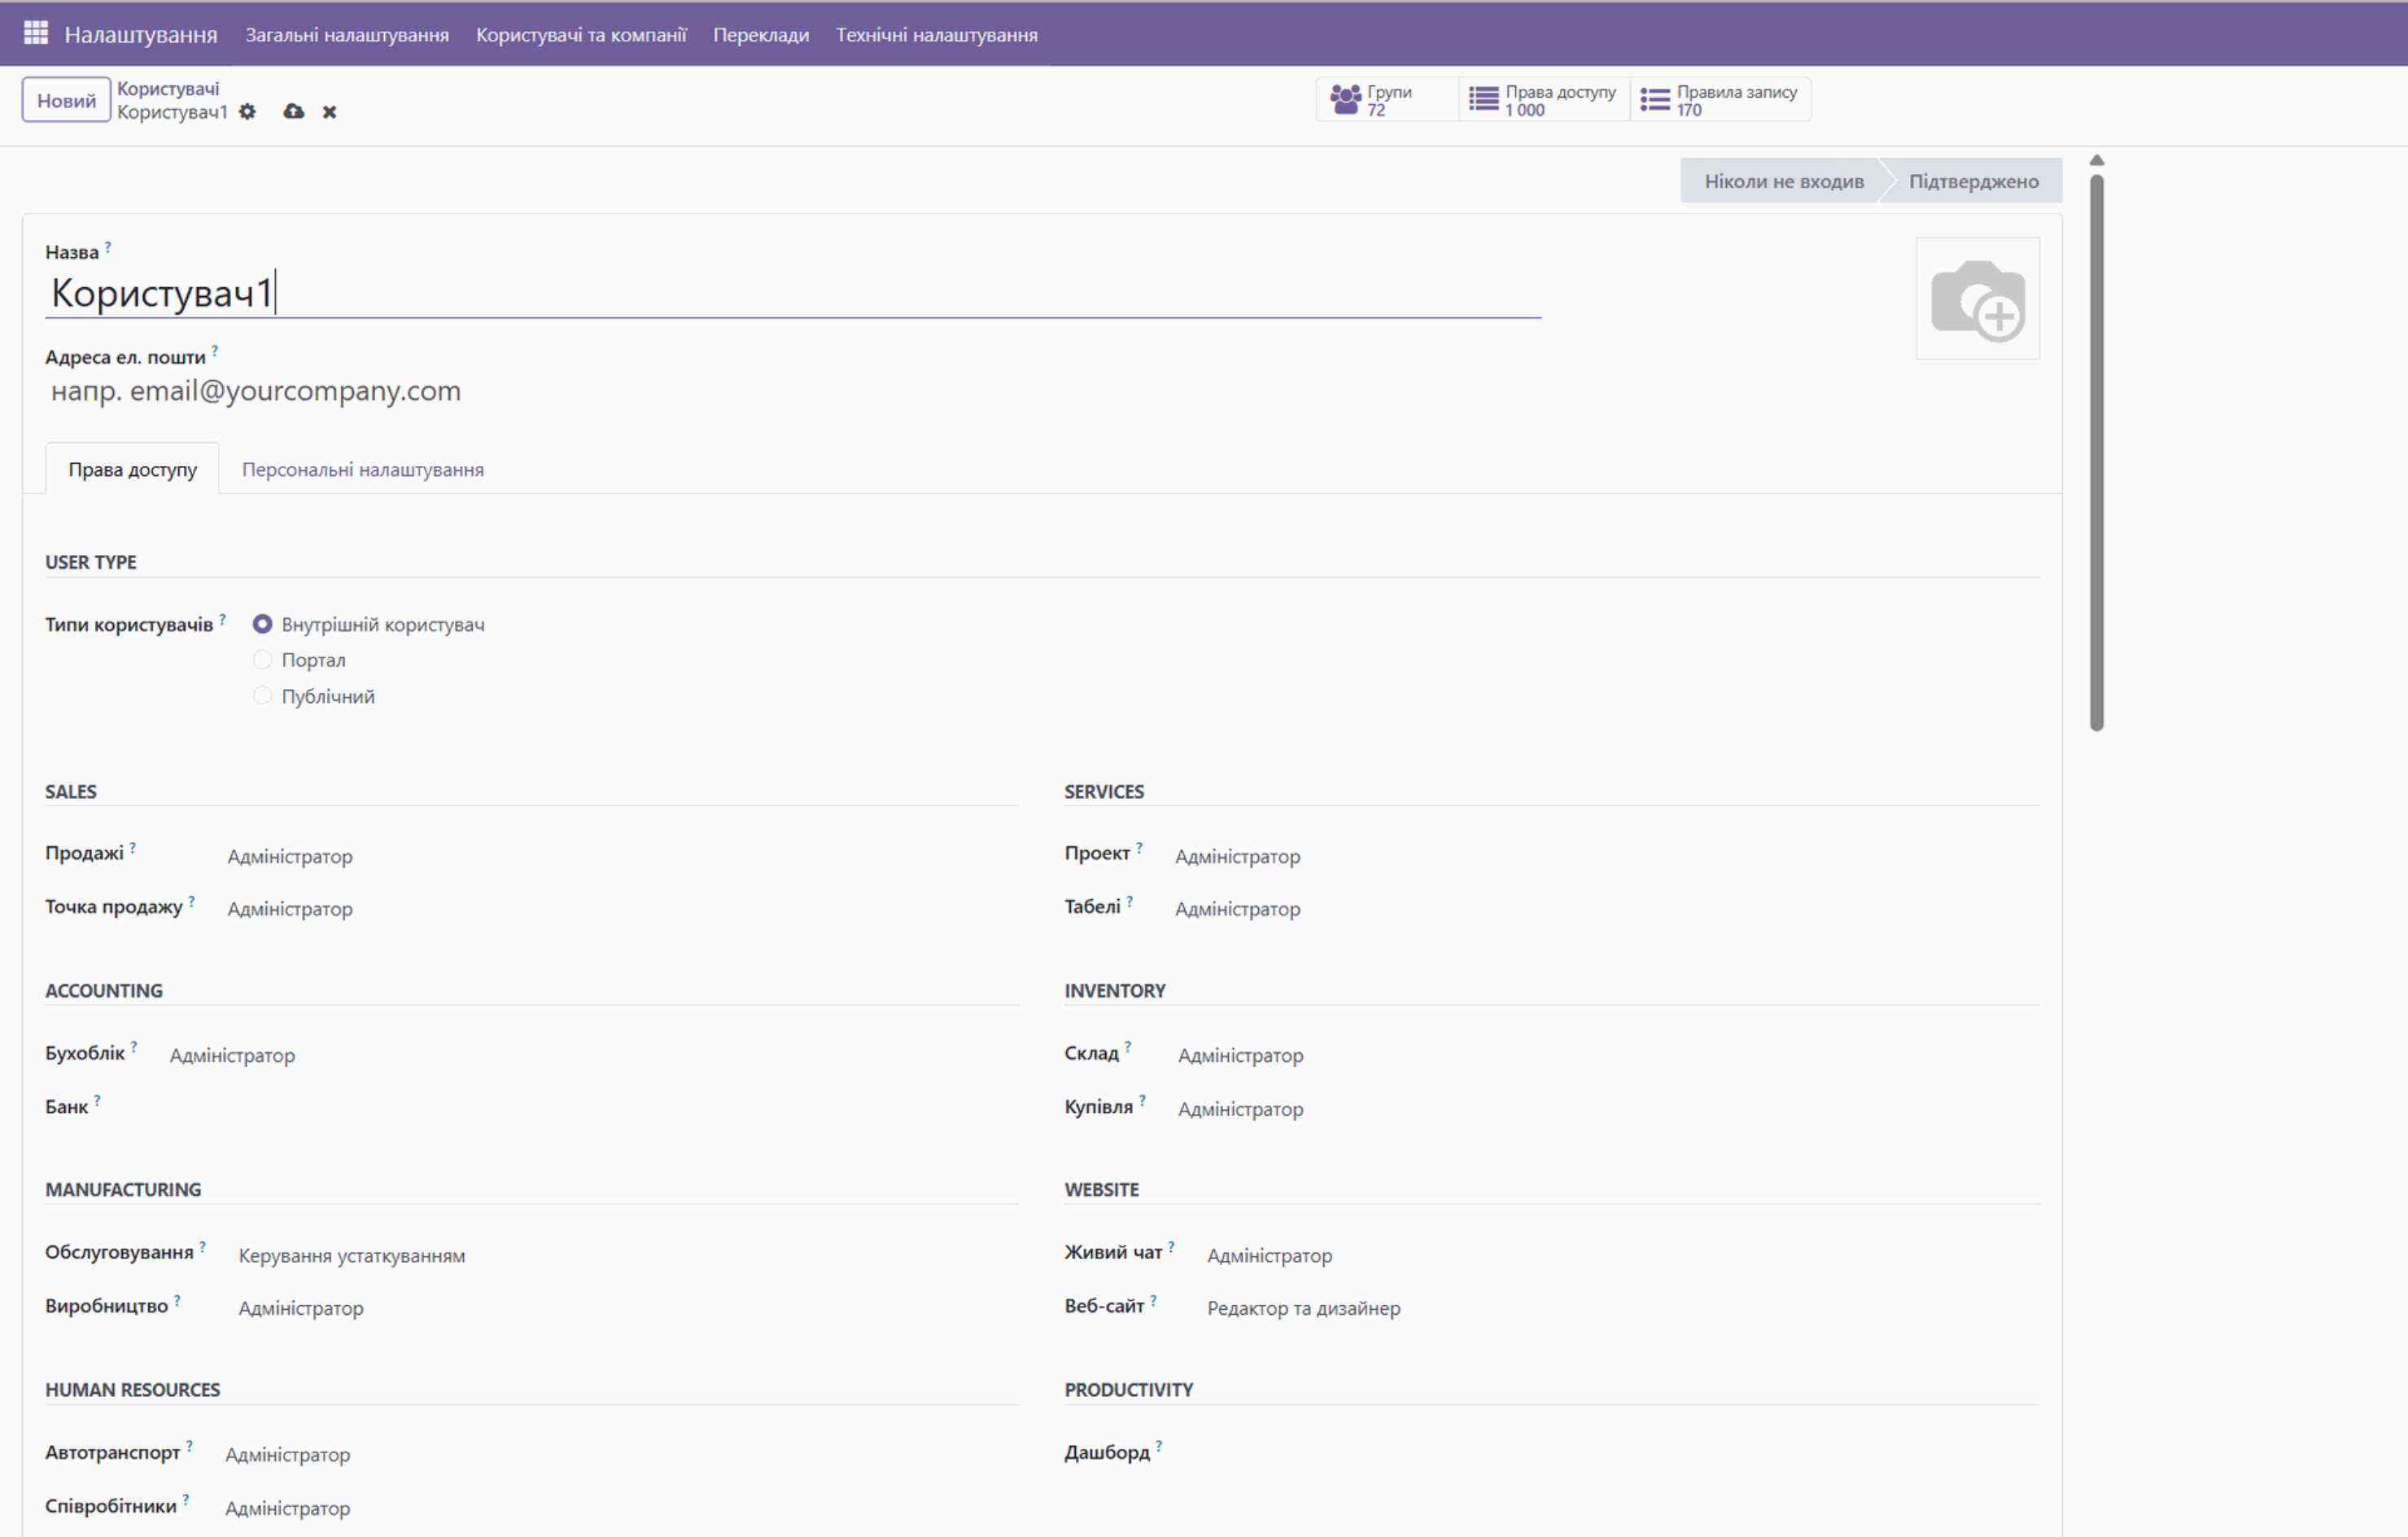
- Invite User: After saving, Odoo will automatically send an email to the user with a link to set a password, if you have configured the appropriate email services.
Configuring User Access Rights
Odoo uses an access rights system to control what users can see and do in the system.
- User Groups: Access rights are defined through user groups. Users can be members of one or more groups.
- View Groups:
- Go to "Settings" > "Users & Companies" > "Groups".
- Here you will see a list of available user groups.
- Edit Group:
- Select the group you want to change.
- On the "Access Rights" tab you will see a list of applications and corresponding access rights for this group.
- Check or uncheck boxes to grant or deny access to certain functions.
- Save Changes: Click the "Save manually" button or navigate to another menu for automatic save
- Assign User to Group:
- Go to "Settings" > "Users & Companies" > "Users".
- Select the user to whom you want to assign a group.
- On the "Access Rights" tab, select the groups you want to add the user to.
- Save Changes: Click the "Save manually" button or navigate to another menu for automatic save
4. Installing Applications
Odoo has a modular structure, which means you can install only the applications you need.
- Go to "Apps" Menu: Click on the "Apps" icon on the main panel.
- Search for Applications: Use the search field to find the desired application.
- Install Application: Click on the application icon to view its description. If you want to install the application, click the "Install" button.
- Configure Application: After installing the application, you may need to configure it. Go to the application menu and find the "Settings" section.
5. Email Configuration
Configuring Outgoing Email (SMTP)
- Enable Developer Mode:
- Go to "Settings" > "General Settings".
- Scroll down to the "Developer Tools" section and activate "Activate the developer mode".
- Go to Outgoing Email Settings:
- Go to "Settings" > "Technical" > "Outgoing Mail Servers".
- Create New Outgoing Server:
- Click "Create".
- Fill in the following fields:
- Description: Describe this server (e.g., "Gmail SMTP").
- Priority: Specify priority (usually 10).
- Hostname (SMTP Server): Specify the SMTP server address (e.g., smtp.gmail.com).
- Port (SMTP Port): Specify the SMTP port (e.g., 587 for TLS or 465 for SSL).
- Secure Connection (Connection Security): Select "TLS (STARTTLS)" or "SSL/TLS".
- Username: Specify the email address from which emails will be sent (e.g., your_email@gmail.com).
- Password: Specify the password for this email.
- Sender (From Filter): (Optional) Specify the domain from which emails will be sent (e.g., @gmail.com).
- Click "Test Connection" to verify the settings are correct.
- Click the "Save manually" button or navigate to another menu for automatic save
Configuring Incoming Email (IMAP/POP)
- Go to Incoming Email Settings:
- Go to "Settings" > "Technical" > "Incoming Mail Servers".
- Create New Incoming Server:
- Click "Create".
- Fill in the following fields:
- Description: Describe this server (e.g., "Gmail IMAP").
- Action (Action to Perform): Select what to do with received emails (e.g., "Create a New Email").
- Server (Server Type): Select "IMAP" or "POP".
- Server Name: Specify the IMAP/POP server address (e.g., imap.gmail.com).
- Port: Specify the IMAP/POP port (e.g., 993 for IMAP SSL or 995 for POP SSL).
- Secure Connection (SSL/TLS): Select "SSL/TLS".
- Username: Specify the email address from which emails will be received (e.g., your_email@gmail.com).
- Password: Specify the password for this email.
- Actions Performed (Options):
- Filter (Filter by Subject): (Optional) Specify a filter to process emails with a specific subject.
- Create a New Email: Creates a new message in Odoo.
- Create a New Record: Creates a new record in the specified model (e.g., lead).
- Interval (Scheduled Action Interval): Specify how often Odoo should check email (e.g., every 5 minutes).
- Click "Test Connection" to verify the settings are correct.
- Click the "Save manually" button or navigate to another menu for automatic save
Gmail Configuration (Example)
For Gmail, you may need to enable "Less secure app access" or use "App Passwords" if you have two-factor authentication enabled.
- Enabling "Less Secure App Access":
- Go to Google account settings.
- Find the "Security" section.
- Enable "Less secure app access".
- Using "App Passwords":
- Go to Google account settings.
- Find the "Security" section.
- Enable two-factor authentication (2-Step Verification).
- Create an "App Password" for Odoo.
- Use this password in Odoo's outgoing and incoming email settings.
Verifying Settings
- Sending Test Email:
- Go to "Settings" > "Technical" > "Outgoing Mail Servers".
- Select the configured server.
- Click "Test Connection".
- Enter an email address to receive the test email.
- Checking Email Reception:
- Make sure Odoo is receiving emails from the configured incoming server.
- Check if new messages or records are created in Odoo.
Additional Tips
- Use SSL/TLS: Always use a secure connection (SSL/TLS) to protect your email.
- Check Logs: Check Odoo logs for errors related to email.
- Use Filters: Use filters to process emails with a specific subject or from specific senders.
- Odoo Instructions: For additional information, use the official Odoo instructions: https://www.odoo.com/documentation/18.0/applications/general/email_communication.html
6. Data Import and Export in Odoo 18
Data Import
Data import is an effective way to load large volumes of information into Odoo, allowing you to quickly populate the system with initial data or update existing records.
Data Import Process
-
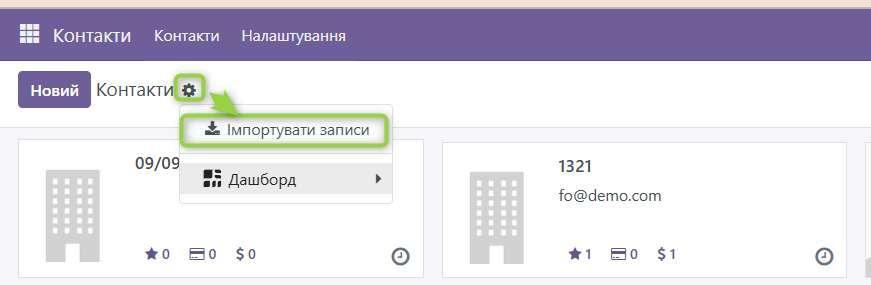
Go to the Desired Module: Open the Odoo module where you want to import data (e.g., "Contacts", "Inventory").
-
Click "Action" Sign and "Import Records"
-
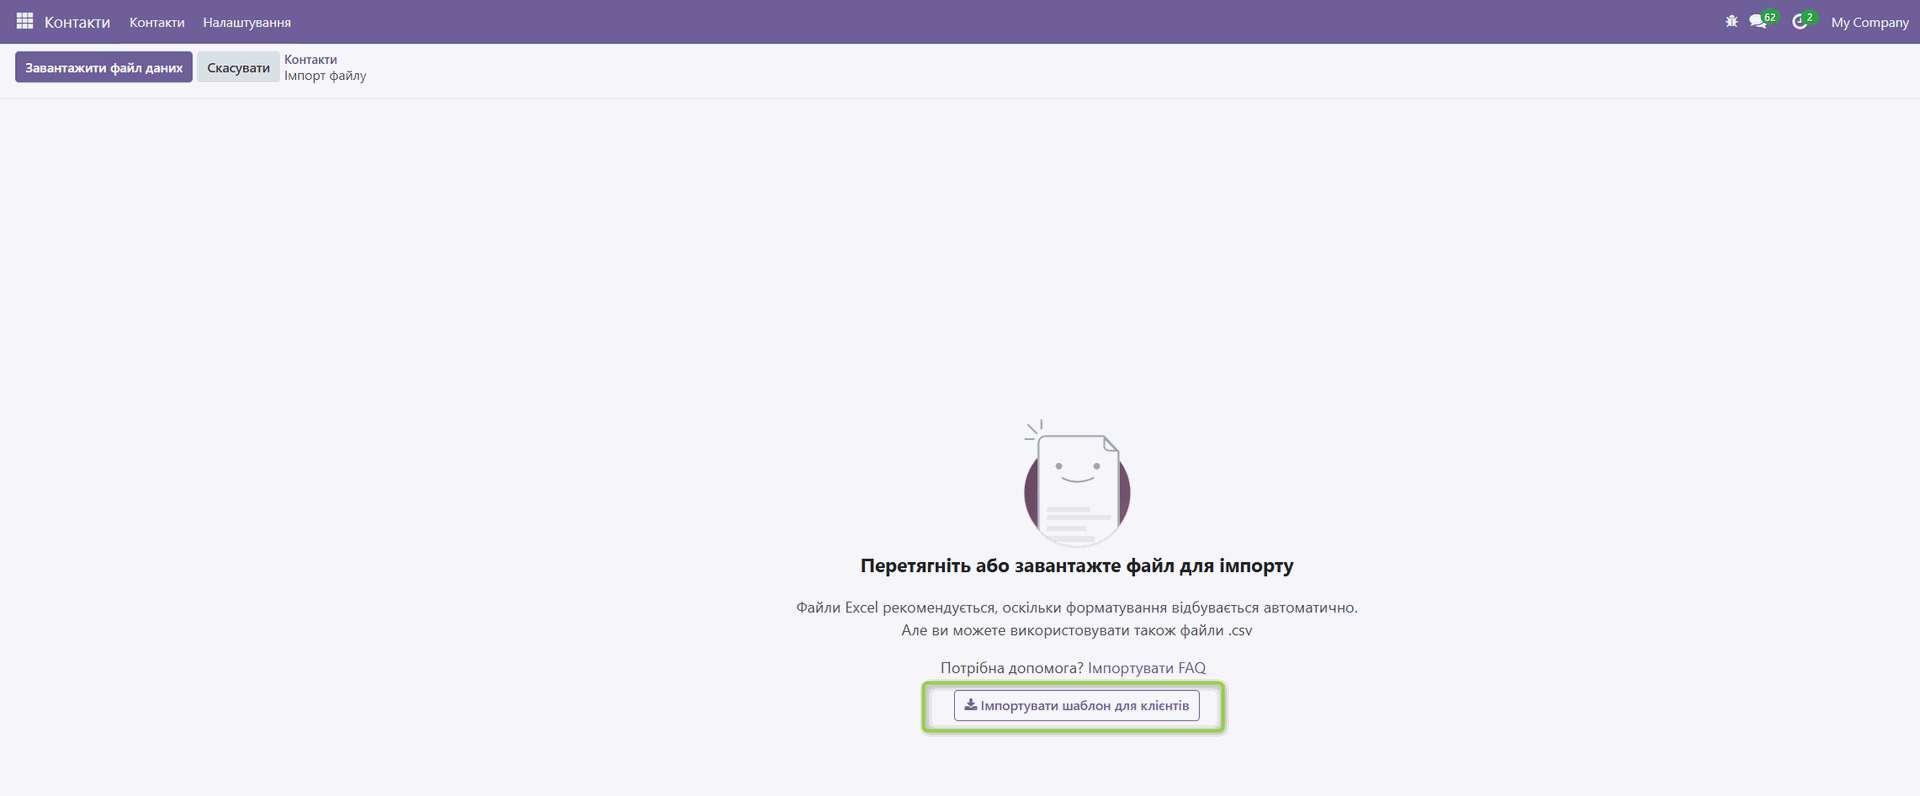
Import Data File Template: For convenience in creating an import file, download a template of such a file
Preparing Data for Import
- File Format: Odoo supports data import in two main formats:
- CSV (Comma Separated Values): Text format where values are separated by commas. Recommended for large data volumes.
- Excel (XLSX): Spreadsheet format. Convenient for editing and viewing data before import.
- File Structure:
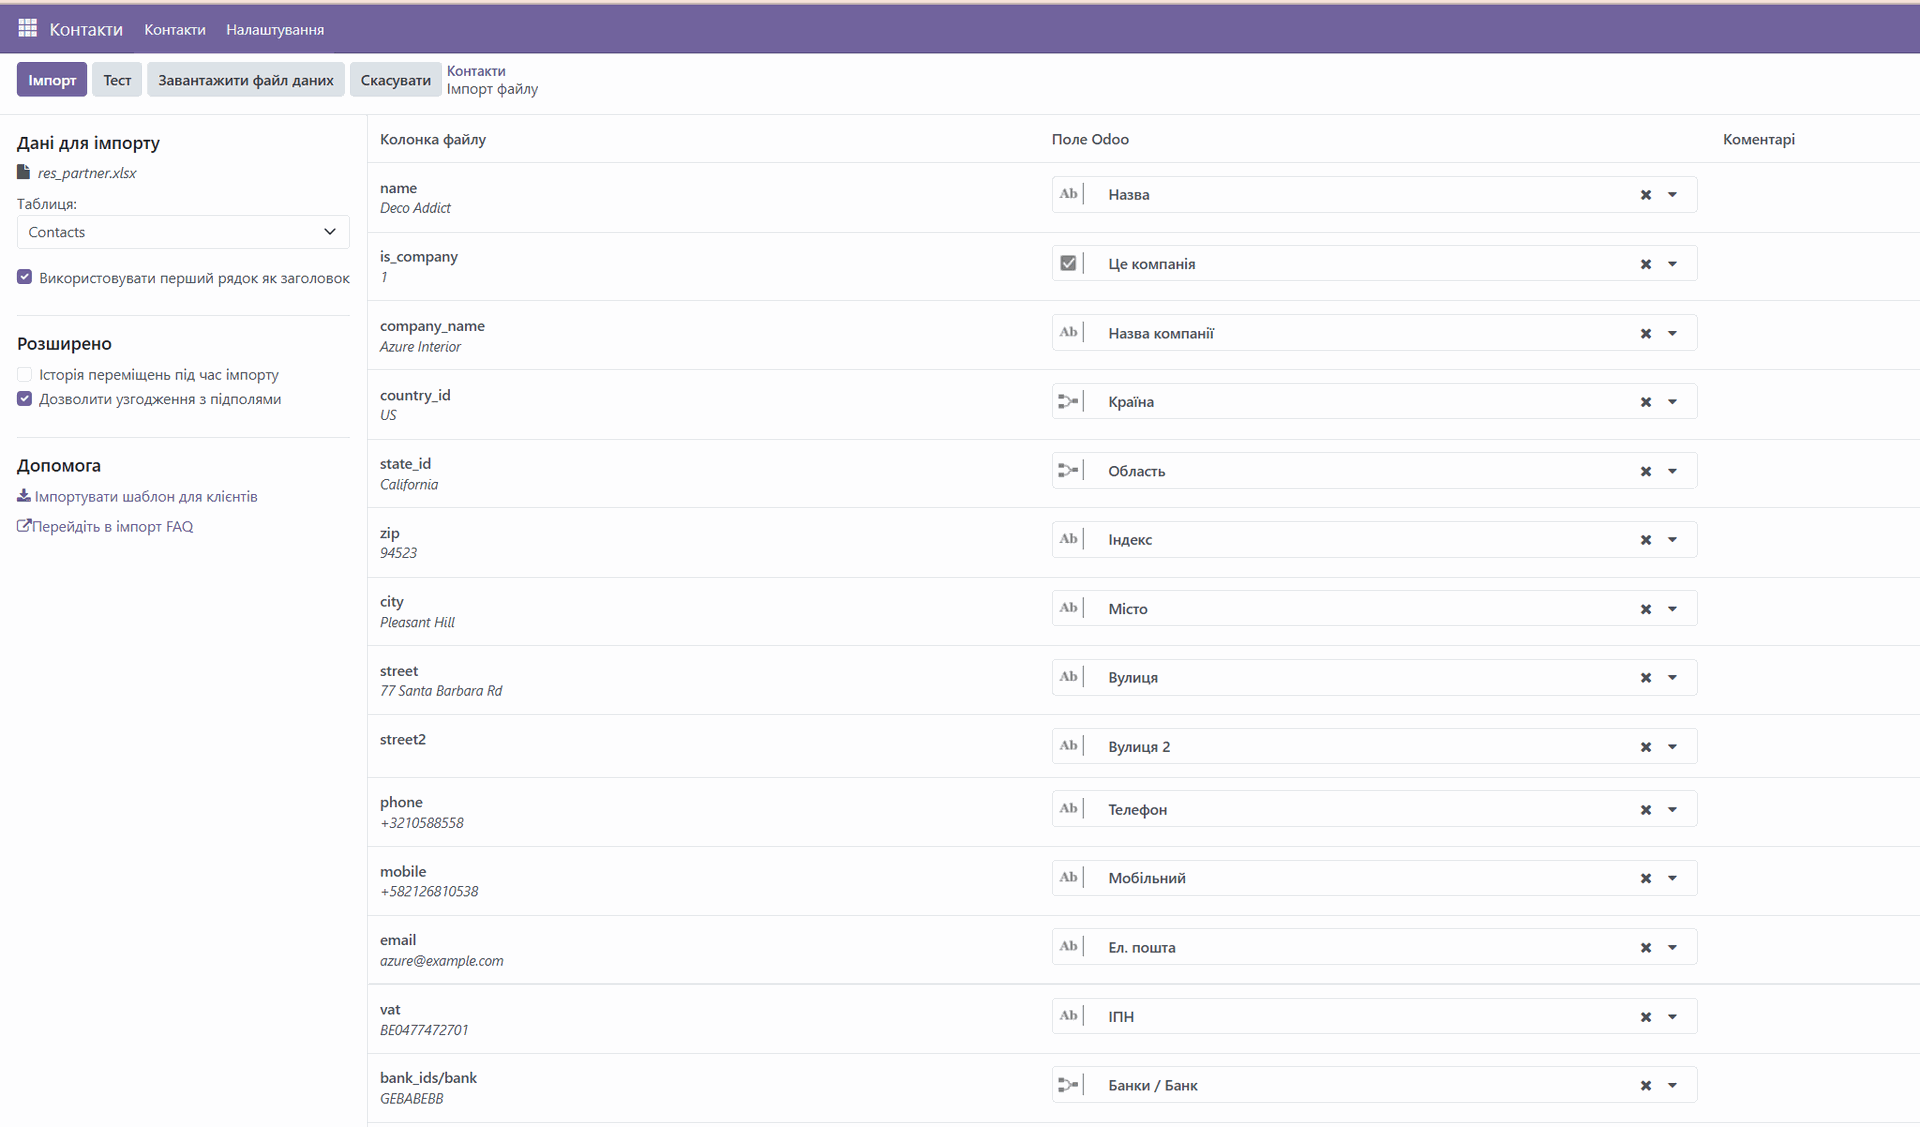
- Column Headers: The first row of the file should contain column headers that correspond to field names in Odoo. It's important that headers are accurate and match Odoo's internal field names (see "Advanced Import Features" section).
- Data: Each subsequent row represents one record (e.g., one contact, one product).
- Data Formatting:
- Text: Text values should be encoded in UTF-8.
- Numbers: Numbers should be formatted according to Odoo's regional settings (e.g., decimal separator).
- Dates: Dates should be formatted according to the format set in Odoo (e.g., YYYY-MM-DD).
- Boolean Values: Boolean values (True/False) should be represented as 1/0 or True/False.
- Required Fields: Make sure all required fields for the corresponding Odoo model are filled in your import file.
- Unique Identifiers: If you are updating existing records, you need to include a unique identifier for each record in the import file (e.g., ID).
File Upload Process
-
Upload File: Click "Upload file" and select the data file for import.
-
Check Column Matching: Odoo will automatically try to match column headers in your file with fields in Odoo. Check that all columns are matched correctly. If not, you can manually select the appropriate Odoo field for each column.
-
Import Options:
-
Import Mode: Select whether you need to create new records, update existing records, or perform both actions.
-
Options: Depending on the module, additional import options may be available (e.g., error handling, data validation).
-
Test Import: It's recommended to first test the import with a small amount of data to make sure everything works correctly.
-
Import Data: Click the "Import" button to start the import process.
-
Check Results: After the import is complete, check that all data was imported correctly. Review the record list and make sure all fields are filled correctly.
Advanced Import Features
- Importing Related Data: You can import data related to other records in Odoo. To do this, you need to use external identifiers or IDs of related records.
- External IDs: Unique identifiers used to reference records in other modules or databases.
- ID: Internal identifiers of records in Odoo.
- Importing Images: You can import images by specifying the image URL in the import file.
- Importing Multiple Values in One Field: Some fields in Odoo can contain multiple values (e.g., tags). To import multiple values in one field, use a separator (e.g., comma).
- Using Formulas: You can use formulas in the import file to calculate field values.
- Searching Fields by Internal Name: If you don't know the exact field name in Odoo, you can enable developer mode and view the internal field name in the form settings.
Troubleshooting Import Issues
- Validation Errors: Odoo may issue validation errors if data in your file doesn't meet Odoo's requirements. Check error messages and correct data in the import file.
- Incorrect Column Matching: Make sure all columns are matched correctly with fields in Odoo.
- Encoding Issues: Make sure the import file is encoded in UTF-8.
- Data Formatting Issues: Check that all data is formatted correctly (e.g., dates, numbers).
Data Export from Odoo 18 Community
Data export allows unloading information from Odoo for analysis, backup, or exchange with other systems.
- Data Export Process
-
Go to the Desired Module: Open the Odoo module from which you want to export data (e.g., "Contacts", "Inventory").
-
Select Records for Export: Select the records you want to export. You can select all records by checking the box at the top of the list, or select individual records.
-
Click "Action" Button: Usually the "Action" button is located at the top of the record list.
-
Select "Export": In the "Action" menu, select the "Export" option.

-
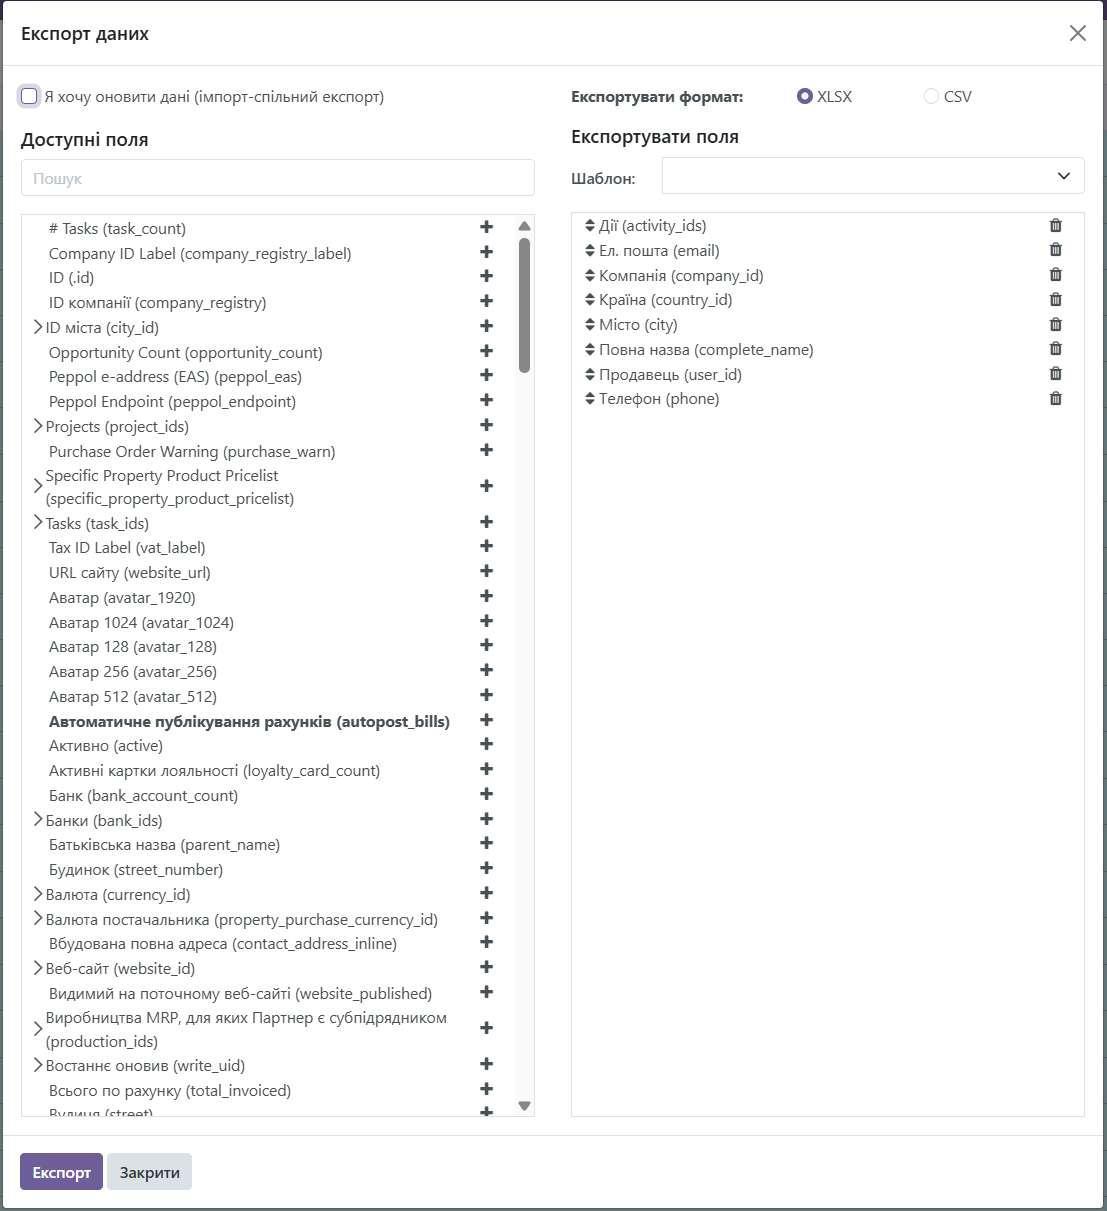
Select Fields for Export: In the export window, select the fields you want to include in the export file. You can select all fields or select individual fields.
-
Export Options:
- File Format: Select the export file format: CSV or Excel (XLSX).
- Export data compatible with import: If you plan to import data back into Odoo, select this option. This will ensure the export file is formatted correctly for import.
-
Export Data: Click the "Export" button to start the export process.
Save File: Save the export file to your computer.
Advanced Export Features
- Exporting Related Data: You can export data related to other records in Odoo. To do this, you need to select the corresponding fields in the export window.
- Using Filters: You can use filters to export only certain records.
- Exporting Data from Multiple Modules: You can export data from multiple modules simultaneously by creating a report that combines data from different sources.
Troubleshooting Export Issues
- Missing Data: If some fields in the export file are empty, this may be because these fields are not filled for the corresponding records in Odoo.
- Incorrect Data Formatting: Check that all data is formatted correctly (e.g., dates, numbers).
- Encoding Issues: Make sure the export file is encoded in UTF-8.
Recommendations
- Backup: Before importing large volumes of data, always make a backup of your Odoo database.
- Testing: Always test data import and export with a small number of records to make sure everything works correctly.
- Documentation: Refer to the official Odoo documentation for additional information and tips https://www.odoo.com/documentation/18.0/applications/general/email_communication.html.
7. Warehouse Module Configuration:
-
**Basic Configuration:
- Go to the "Inventory" module.
- Select "Configuration" > "Settings".
- Basic Settings:
- Units of Measure: Enable if you use different units of measure for products.
- Warehouse Operations:
- Storage Locations: Enable if you use multiple warehouse locations.
- Lots & Serial Numbers: Enable if you track products by lots or serial numbers.
- Other Settings: Be sure to learn more before activating or deactivating other settings by clicking the question mark next to the setting name or in Odoo documentation https://www.odoo.com/documentation/18.0/applications/inventory_and_mrp/inventory.html.
-
Warehouse Locations Configuration:
- Go to "Configuration" > "Locations".
- Create warehouse locations that correspond to your physical warehouse structure (e.g., main warehouse, scrap zone, transit warehouse).
- Specify the warehouse location type (e.g., internal, external, virtual).
- Learn more at: https://www.odoo.com/documentation/18.0/applications/inventory_and_mrp/inventory/warehouses_storage/inventory_management/use_locations.html
-
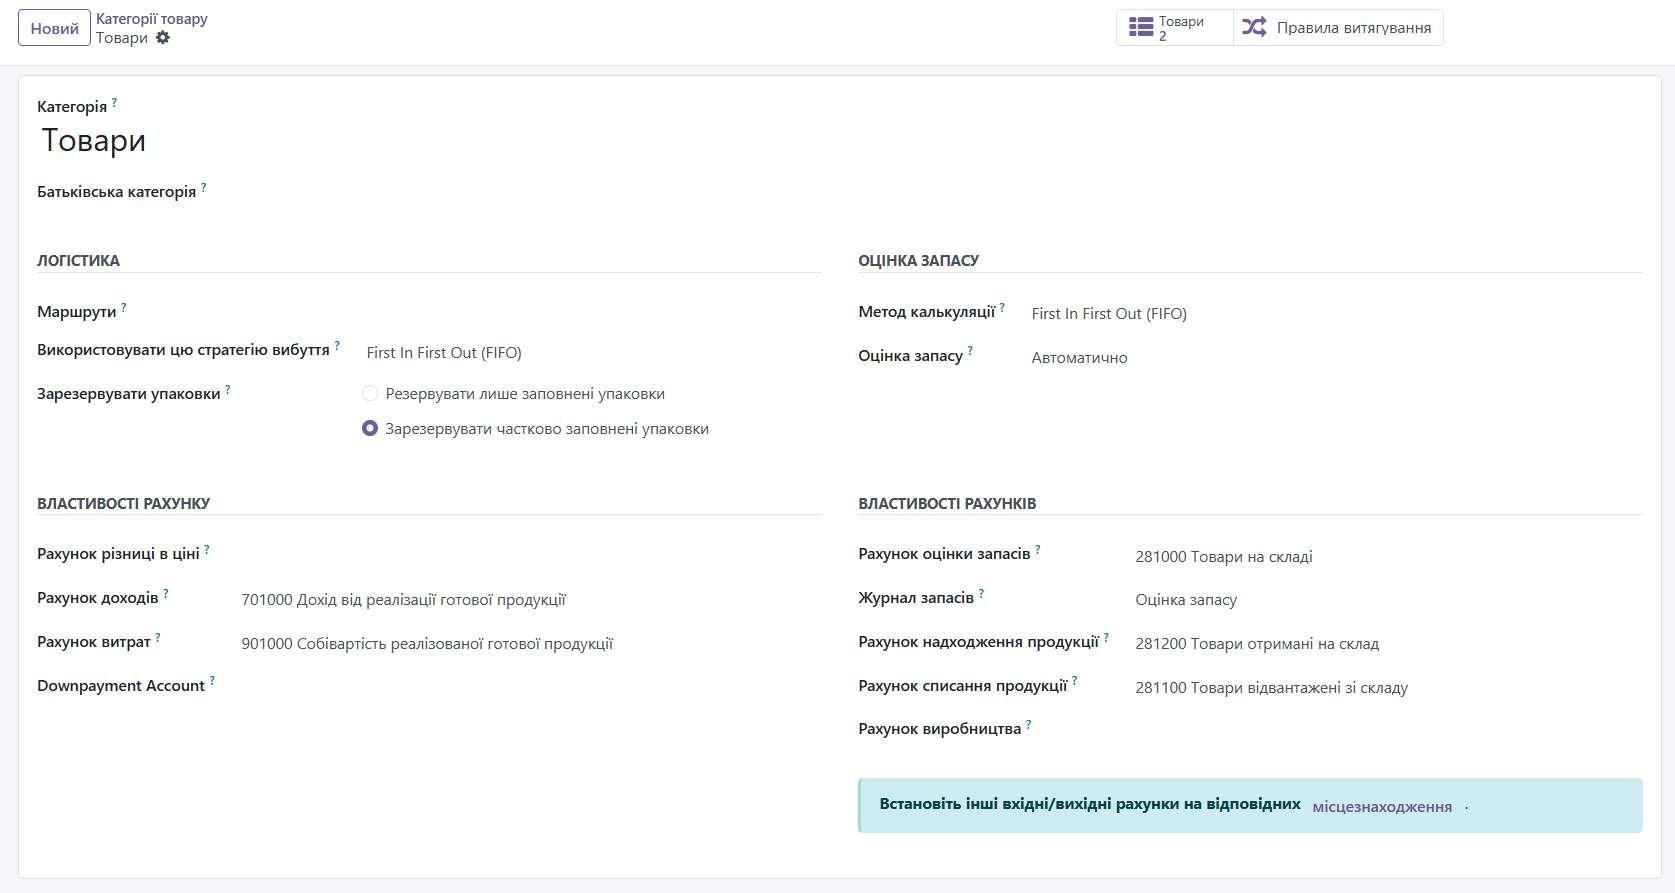
Product Categories Configuration:
- Go to "Products" > "Product Categories".
- Create product categories to organize your products (e.g., raw materials, finished products, components).
- Specify the inventory valuation method and costing method for each category.
- Inventory Valuation Method:
- Manual: Inventory valuation is performed manually at the end of the period.
- Automated: Inventory valuation is performed automatically with each operation. Recommended for accurate accounting.
- Costing Method:
- FIFO (First In, First Out): The first product received in stock is written off first.
- LIFO (Last In, First Out): The last product received in stock is written off first.
- Average Cost: Product cost is calculated as the weighted average cost of all products in stock.
8. Inventory Management
Creating Products:
-
Go to "Products" > "Products".
-
Click "Create".
-
Fill in product information:
- Product Name: Product name.
- Product Type:
- Storable Product: Product that is stored in warehouse.
- Service: Service that is not stored in warehouse.
- Combo: Product that consists of multiple products.
- Internal Reference: Unique product identifier.
- Barcode: Product barcode.
- Sales Price: Product sales price.
- Cost: Product cost.
- Product Category: Category to which the product belongs.
- Unit of Measure on Sales Price: Product unit of measure (e.g., piece, kilogram).
- Purchase Unit of Measure on Cost: Unit of measure used when purchasing the product.
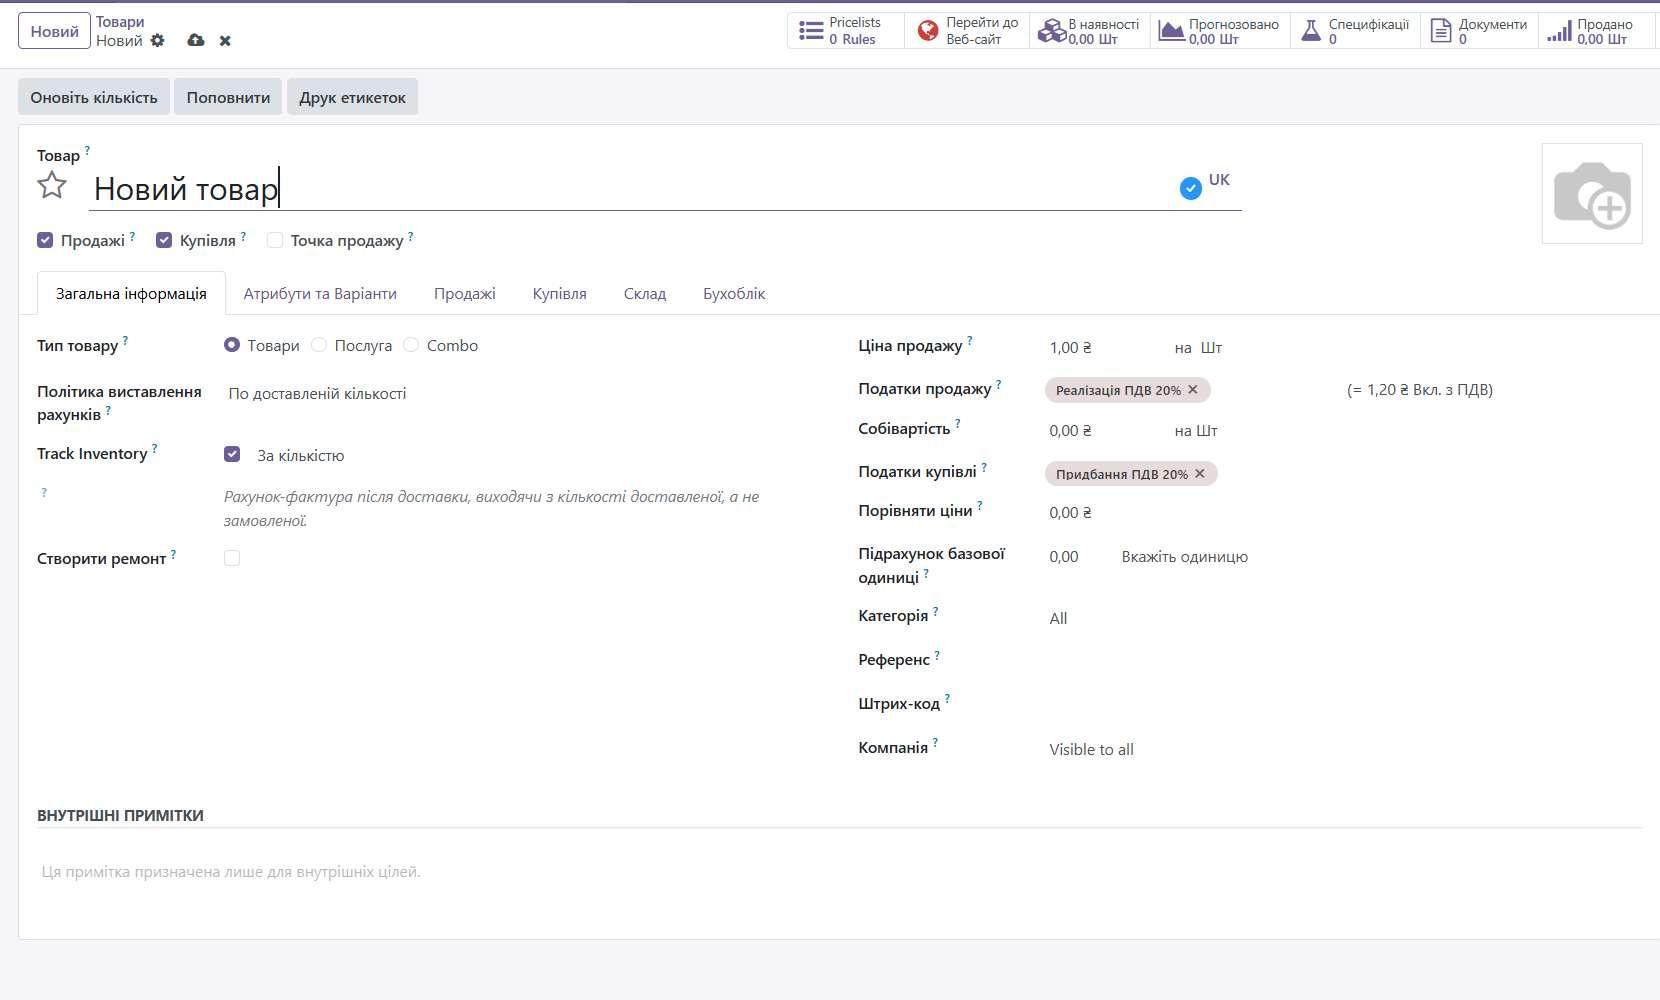
Click the "Save manually" button or navigate to another menu for automatic save
Initial Product Balances:
- Go to "Operations" > "Inventory Adjustments".
- Click "Create".
- Select warehouse location (Location).
- Add products and specify their quantity:
- Click "Add a line".
- Select product (Product).
- Counted Quantity.
- Click "Apply".
Warehouse Operations:
- Receipts: Registering receipt of products to warehouse.
- Deliveries: Registering shipment of products from warehouse.
- Internal Transfers: Moving products between warehouse locations.
- Inventory Adjustments: Adjusting product quantities in warehouse (e.g., after inventory count).
Reordering Rules:
- Go to "Products" > "Reordering Rules".
- Click "Create".
- Select product (Product).
- Select warehouse location (Location).
- Specify minimum quantity (Minimum Quantity) and maximum quantity (Maximum Quantity).
- Specify quantity to order (Quantity to Order).
- Click the "Save manually" button or navigate to another menu for automatic save
Conclusion
This is just the beginning of your journey with Odoo 18 Community. Experiment with different applications and settings to find the best way to use Odoo for your business.